April 20-25: A 5-Day Learning Frenzy


I have been very delinquent the past week with updates, due to being busy, busy, busy. Did I mention I’ve been busy? Luis Lucio came to Linda’s for 5 days of teaching, plus delivering 2 lectures with Linda. I have been fortunate to take 2 lessons from him, as well as audit the other lessons and attend the lectures. As an added bonus, Linda cooked delicious meals for us before the lectures. My mind is a buzz, and it is not from too much wine.
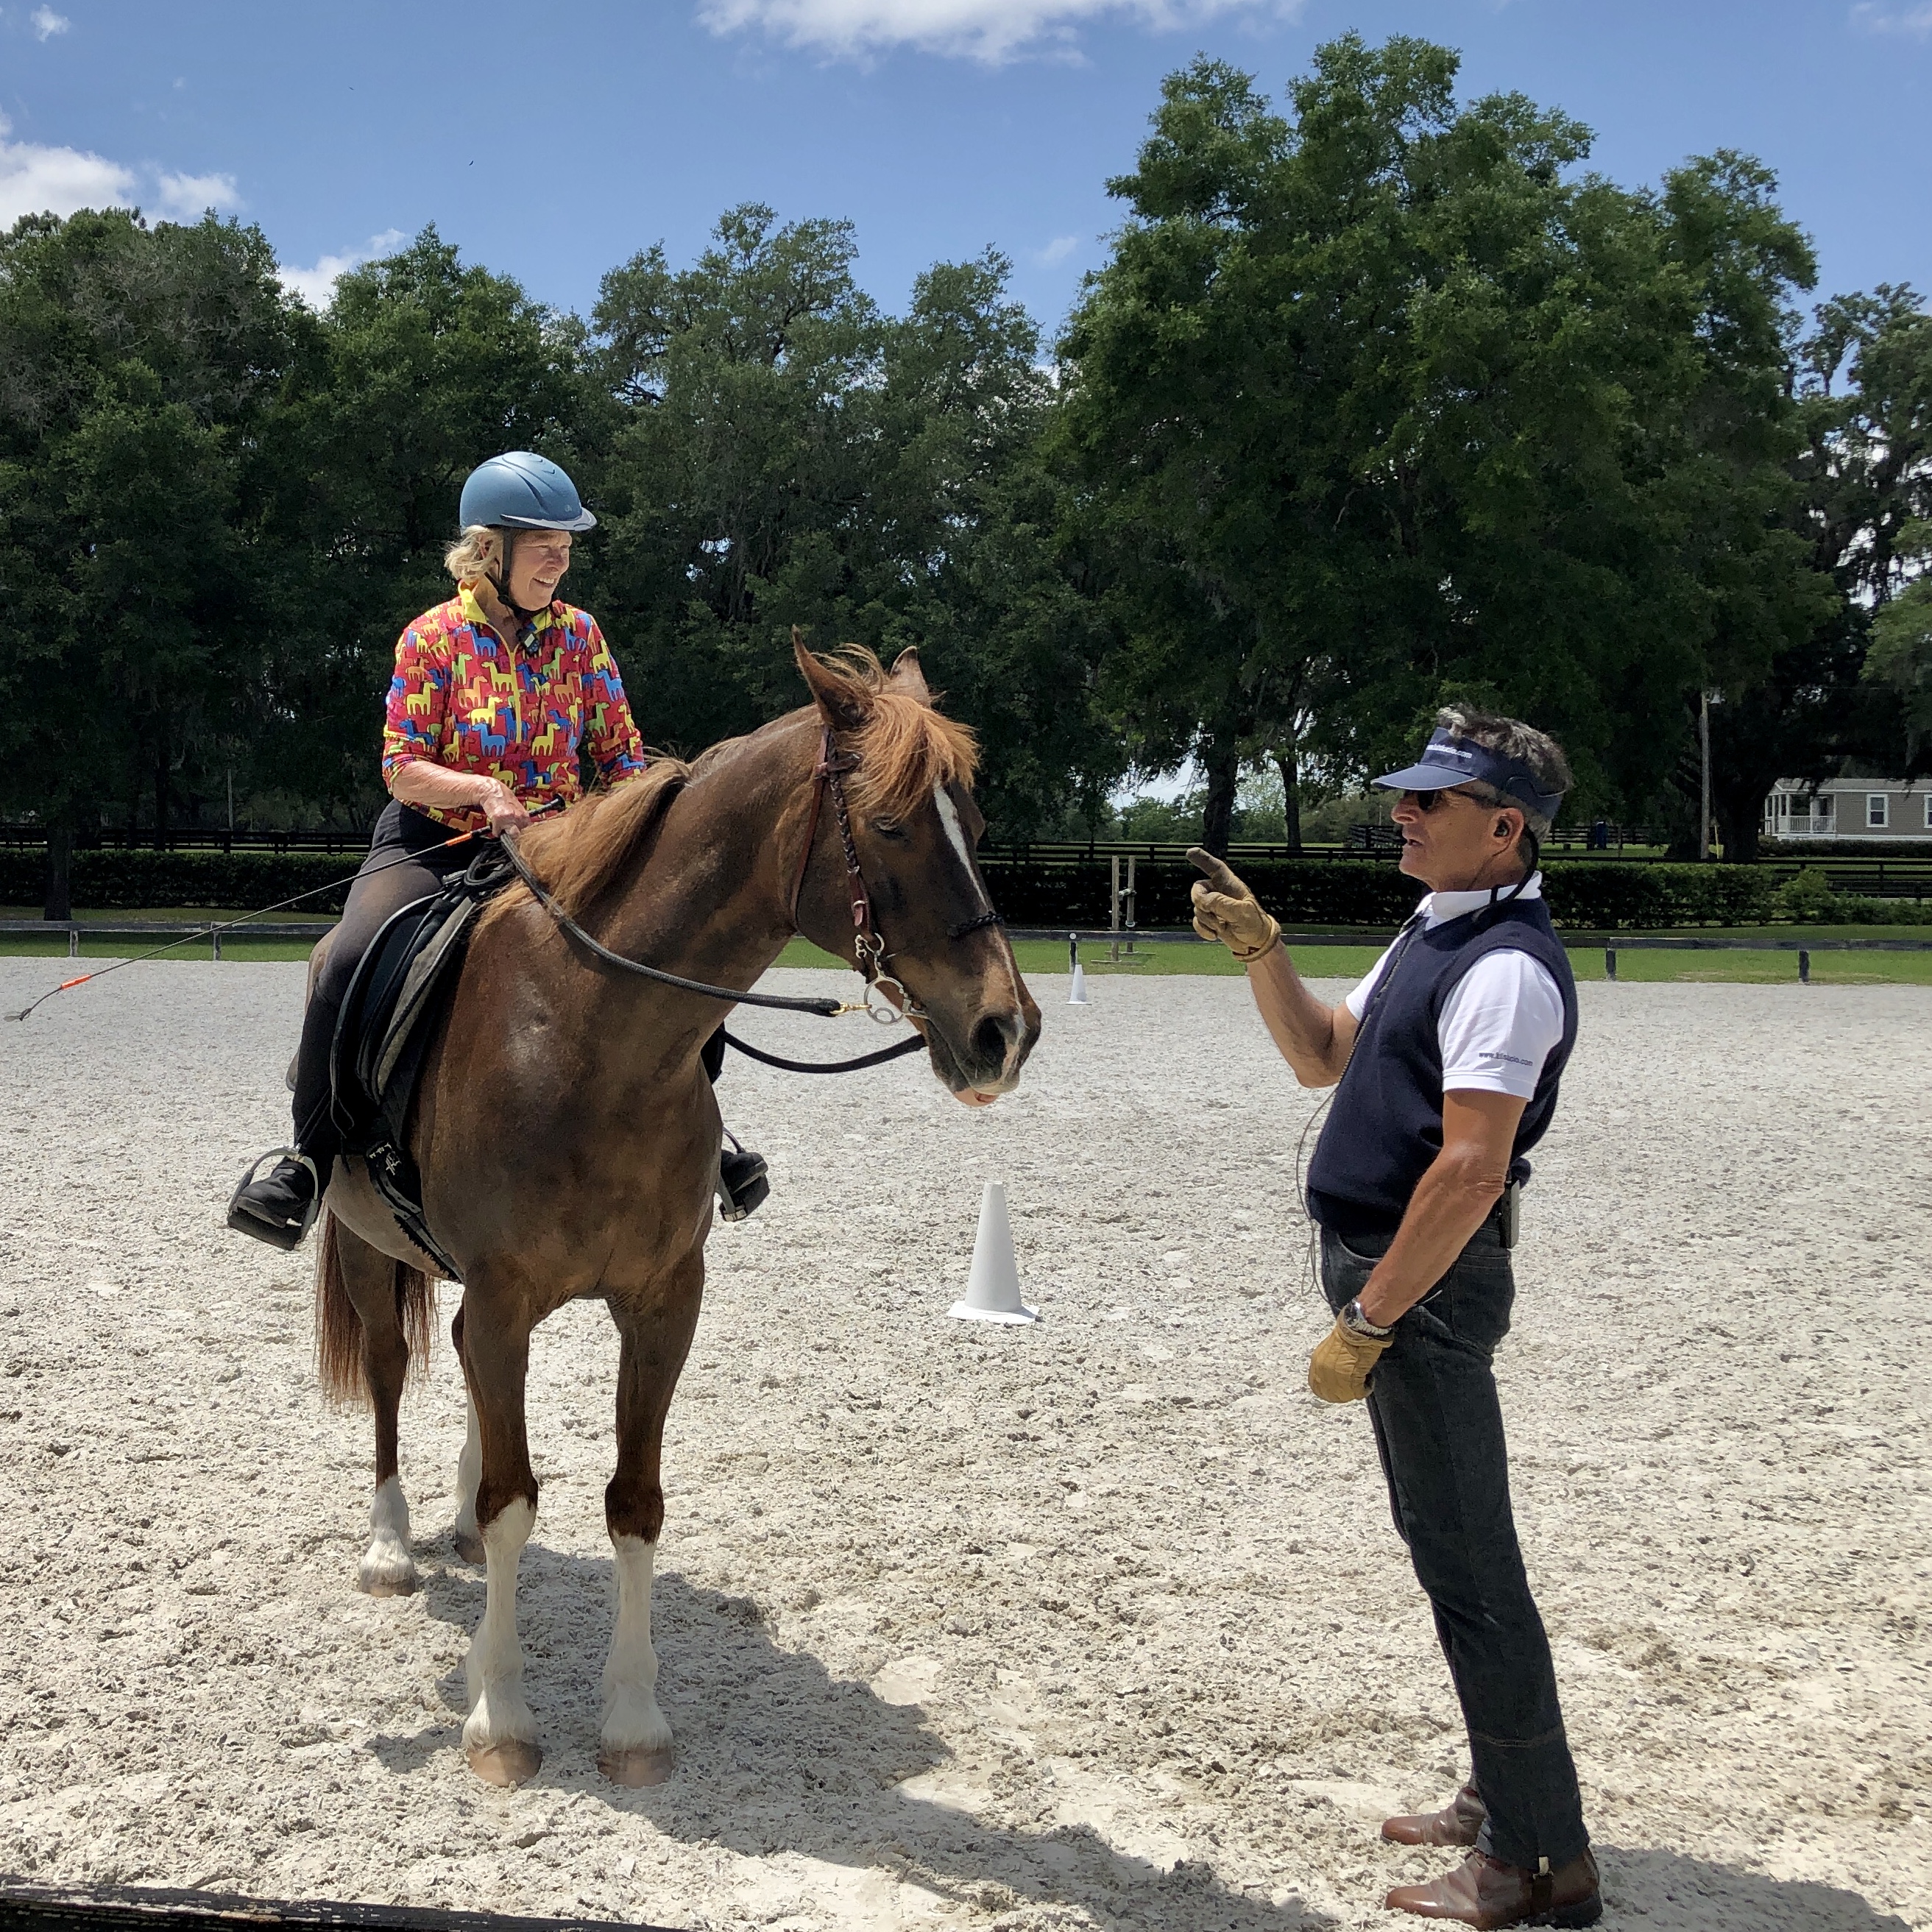
Luis Lucio has an extraordinary knowledge of dressage due to his riding and training experience, but what sets him apart is his training system, which integrates Horse Psychology into the training of Dressage movements. He is a skilled teacher of all level of riders … from Olympians, FEI stars, and even folks like little ole me.
When Luis is looking at a rider, he is looking at three components … Horse/Rider Relationship, Horse/Rider Technical Model, and Decisionsmade by the Rider. The importance of the relationship the rider has with the horse, is in alignment with Linda’s emphasis on Horse Psychology and Behavior, and why she has Connection as the foundation element in her model. This shared passion of putting the horse’s mental and emotional health as a fundamental requirement before building the technical model (horse and rider position/movements) explains the strength of their 22-year friendship and mutual respect for one another. Luis is an incredible teacher, and besides benefitting from my own lessons, it was so interesting to see how he would analyze and customize his lesson for each horse/rider combo.
A few more points about his 3 -part system of Relationship/Technical Model/Decisions.
When a horse is acting fearful, misbehaving, distracted, unconfident, lazy, unmotivated, fighting rider, bolting, bucking, rearing, etc., trainers/rides often aren’t aware that this is related to a Horse Psychology problem. To eliminate/reduce behavior problems requires understanding the horse’s brain. Instead, many trainers/riders solve horse’s mental and emotional issues with more physical pressure and/or technical equipment (severe bits, whips, longer spurs, side reins, head contraptions, etc.) Some horses may comply or cope, but the psychological health of the horse is not addressed, which frequently leads to an unhealthy body position and injury/lameness. And, most importantly, it does not result in a happy horse. During Luis’s lessons, he takes into account the horse’s mental and emotional state, and addresses these problems, before moving on to work on the technical model of the horse and rider. An expression of Luis’s I liked … “The rhythm of progress is dictated by the horse.”
One easy way to measure a horse’s state of mind (anxiety versus comfort) is through measuring the horse’s heart rate. Luis demonstrated this with Linda’s horse, Hot Jazz, who innately is a Tense Stopper, meaning he is introverted, and doesn’t reveal his tension through outward behaviors. However, a heart rate monitor, provides evidence of when he is tense. This is in contrast to a Tense Mover, who will show their tension through actions, like wanting to move faster and faster. As an aside, it is really how quickly a horse’s heart rate can drop when not tense that is most important. Want to know more? Check out an article Luis wrote at http://www.luislucio.com/pdf/seeinside2015.pdf Over a specific bpm, a horse can’t think, so no learning will happen while a horse is overly tense/stressed. (This is true in humans, as well.)
It has got me thinking that it could be interesting to measure heart rate on a variety of horses back at the Rodes Farm Stable doing a variety of activities (e.g., trailer loading, walking across a tarp, walk/trot/canter, etc.)
Back to Luis … One of things he introduces to the training session is the concept of “breaks”, and also letting the horse know when he is responding/moving/behaving the way you would like him to while you are doing an exercise. When he is measuring heart rate, he can assess if a horse needs a break and when to resume riding an exercise/movement. When you are riding and the horse responds by doing what you have asked, he has you “pat” (which really means releasing the pressure of one rein or sometimes both reins by moving your hand forward slightly … as if you were going to pat your horse on the neck.) This release of pressure provides comfort and lets the horse know that he is right. His guideline for training and using reins is 20% correcting (pull), 30% neutral and 50% give (release pressure in a rein(s.) This approach leads to a horse who is more emotional fit and understands what you want. Builds an understanding and relationship between horse and rider, as opposed to the horse just being a means to rider’s competition goals.
One of his comments … Don’t be afraid to give [your rein.] Otherwise, it is the beginning of the end [of your successful training.]
A little about the 2nd component, Model. This part of the system refers to how the horse’s body position should be, and in dressage is dictated by the movement elements defined in the different skill levels of competition tests.
When a rider is sitting on a horse, the horse needs strong abdominal control to support the weight. This can be achieved through riding with tempo control and stride lengthening control. During his lessons, Luis teaches the exercises that will strengthen the horse’s abdominal muscles.
And what does the 3rd component, Decision, refer to? Based on the knowledge of the psychological and technical status of the horse, what can you, the rider, do today to improve? And, how might your prioritize your action plan? Good Decisions require strong Relationship and Technical Model. Must made decisions that will make small improvements. Another example of Decision is when rider choses the length of stride ( i.e., control the step ) … not the horse choosing.
The questions that a rider asks and the decisions he/she makes, are factors in the success of the rider’s goals. For example, is your horse physically healthy? Emotionally ready? Has the rider prepped the horse by doing on-line exercises?
Luis showed us an on-line exercise that he has all his clients do to ensure that the horse can stay at the end of a 22 -30 foot line while the rider walks in a large circle, and rider is able to move the horse away from him by horse going sideways and increasing the diameter of the circle. Once horse moves away as you walk toward him, have horse walk and see if horse relaxes. This exercise keeps the horse thinking and engaged and prevents injuries, compared to the more traditional practice of lunging a horse in smaller circles. Objective is to have horse go away from you, and rider then gives less orders. Yes, you want the horse connected with you, but curious and relaxed. Objective is to warm up horse’s brain, first and not just move. This is an approach to helping horse get control of their emotions.
Now, to some specifics, based on my lessons and auditing others. This will be a bit of a jumble, so you won’t hurt my feelings if you skip this … besides, how would I know?
My 1st lesson:
Toby was distracted at start of lesson, so Luis coached me to ride a line and let Toby know when he is doing what I want. Say “yes” with a “pat” motion after I get a few good strides. Riding a line provides a way to clarify behavior I want (release) and correct when not what I want. When horse is distracted, this is easier for clarity than riding in circles or other patterns. Riding a line with focus on straightness helps both rider’s focus and horse’s understanding of “yes” behavior. Be sure to keep hands quiet and be clear when correcting, so horse does not feel as though he is always being corrected.
One revealing exercise, was when Toby and I cantered in a circle. After we completed a few circles, Luis asked me how I would rate the canter on scale of 1 -10. I said maybe a “5”, worried that it might have been lower than that in his expert assessment. Luis started to ask me a series of questions … “Was the depart of the canter from the walk good?” I answered “yes”, as it was. “Was the circle round?” yes. “Was the speed even?” yes. And a few more questions, to which the answer was yes. He said he would rate it a 7-8! How cool is that? So, then he challenged me to do the exercise again and ride to get a 7, based on my thinking it was a 5. We did this sequence until I could rate it a 9. Lesson to self … don’t be to self critical and be sure Toby knows he is doing well (through mini releases.)
Lesson 2:
After 3 days of practicing during the clinic’s lunch breaks, I had my 2nd lesson. Toby and I picked up from where he left off in first lesson, and Luis was pleased with our warm-up. Tempo of trot feels slow, but by keeping the speed slow, the horse is able to move haunches closer to his front end, which strengthens his abdominal muscles, and provides a roundness to the back as he compresses. This is a healthy position for the horse, and also an element of a good model for a dressage horse position.
We worked on a sequence that Luis used in most of his lessons. 1- Slow tempo by controlling the speed for 1-2 strides; 2 - then give with a pat/soften a rein when horse responds as you asked; 3 - then help horse to contract/shorten body a bit with a tap of dressage whip on hip; and repeat this 3 phase sequence. Give a break with loose reins after a successful movement.
When we worked on canter, we went to another level of refinement. Luis had me reduce the walk speed before asking for depart. He gave me a tip to put my outside leg in position (slightly back) before using it to ask for the depart. Since Toby is so sensitive, Luis had me not move any other part of my body while I gently squeeze outside leg (“only make a suggestion”), and Toby just steps from the walk into the canter. Wonderful feel. We worked on some finesse points, but one new thing I learned. Luis noticed that Toby was long on his right side … not literally longer than his left side, but is stiffer when turning to left than to the right. Most horses have one side that is an easier side than the other, and while it can’t be corrected, you can ride turns/bends differently as you start to do more advanced movements. So, if I am trotting or cantering along the long side of the rail going clockwise, I can “straighten” him by using my left hand to tip his nose slightly to the left (to the outside.) And, when going counter clock-wise, also tip nose to the left (toward inside.) For another example, if I am cantering clockwise and going to turn right down center line, be careful to not let him turn too sharp … hold left rein to adjust. And if going counter clockwise, the turn will need a little more time to get to center line. Fine detail, but fun to play with.
Now comes the jumble of comments/thoughts based on 5 days of observing Luis teach.
Linda rode Jazz on first day and last day and Luis rode him the days in the middle. Just a joy to watch. Jazz is a complex horse emotionally, so they used the heart monitor. Used breaks when necessary (rate over 112) and restarted exercises when heart rate returned to acceptable level (under 80.)
Other snippets from other lessons.
- Ride the circle like a line … focus on the curving line.
- Reins only used used for speed control and direction.
- “Neutral” is the only chance for the horse to understand what causes release.
- Counter-canter exercise: ask along the rail (think rein back when you ask) and canter 4 strides, then walk 4 strides, and counter canter.
- At a trot, count “2” when outside leg/hindquarter comes forward. Do this until you feel it. Then count “1” for other diagonal (inside hindquarter comes forward.) Only on count “1” is when you use inside hand to tap hindquarter. Used to improve collection. This was observed during Courtney and Mele lesson. Also during Courtney’s lesson was a canter to walk exercise in a small circle with hindquarters angled in toward center of circle. Way over my experience level, but fun to watch.
- Another exercise to help control tempo and engage hindquarters: small walk (speed #1), then trot, asking hindquarters to move first; then back to #1 walk, turn on the haunches, and repeat. Same exercise in walk-to-canter.
- Sometimes do turn-on-haunches back to back.
- Rein back helps to compress body shape. Ask for back and release. Expect horse to continue to back. Rein back – trot – rein back – halt after rein back, then walk to trot.
- Goal is short body and long neck . Enemy is contact that can be too tight. Enemy is too much forward. Must have compact body first and then can ask for forward.
- Canter is healthier than trot. Trot is most often gait that causes injuries in dressage horses.
- What to work on …
- Pushing power – go forward with compact horse body using horse’s hind legs to push
- Carrying power – get horse sitting down, so they can carry rider.
- When Luis found riders were too heavy with contact, he had then use a string around horse’s neck and rider holds it like a double bridle rein. Amazing to see horse’s relax and lengthen their necks. Rather than loss control, the horse’s relaxed and became quieter.
- To compress canter (and trot) – Hold back – Give – Help from tap – repeat
- Sideways Effect on a Circle – a good exercise for getting horse’s hindquarters under him. Push hindquarters with inside leg and keep hands on the line of the circle. Don’t look down, look at line on circle. When easy on circle, use when turning corner from short side to long side of arena (sit a few strides as you use sideway effect.
- Exercise to get the hindquarters closer to the frontend: 5 steps of small walk, then 5 strides of small trot, then turn on haunches and trot again. Repeat as needed. For this turn on haunches, keep the front end and hindquarters some forward movement. Add some rein backs in sequence.
- As you compress the horse’s body in the canter, ask for jumpy feel.
- Keep feel of compression when transitioning from trot to walk.
- When warming up, get the model feel, but not speed/energy at first.
- When doing turn on haunches, use smaller, quick steps to keep horse compact … think a little rein back feel.
- Luis suggests putting tape on your reins to become aware of whether you are holding reins with equal length. You want symmetry in the contact, and also, once you feel the horse lengthening its neck, tape is a reminder to not shorten the reins, but keep the perfect rein length that gives you that feel.
- Remember to only help/tap after a release mode.
- Shoulder-in: keep neck straight. Legs as if in counter bend and maintain tempo.
In summary, the five days of watching (and personally experiencing) Luis teach has provided me with a wealth of information and insights. It was also an opportunity to observe some very highly skilled riders, such as, of course, Linda Parelli, (and Luis riding her horse, Jazz); her protégé and HHHL instructor, Courtney Crane; Karen Rohlf of Dressage Naturally fame (https://dressagenaturally.net) , 3-Day Eventer and trainer Tik Maynard, (https://www.copperlineequestrian.com), whose book In the Middle are the HorsemenI really enjoyed; Mette Larsen, a USDF Medalist and a trainer (http://www.metlardressage.com); Erin Brinkman, USDF medalist and a trainer (http://www.erinbrinkmandressage.com); plus, some HHHL instructors, including Kelly Sigler Patterson (https://kellysigler.com), Michelle Smith and instructor-to-be Cheryl Almasy.
A 5–day learning frenzy, for sure. Hope I can retain a fraction of the content.


Comments
Post a Comment